
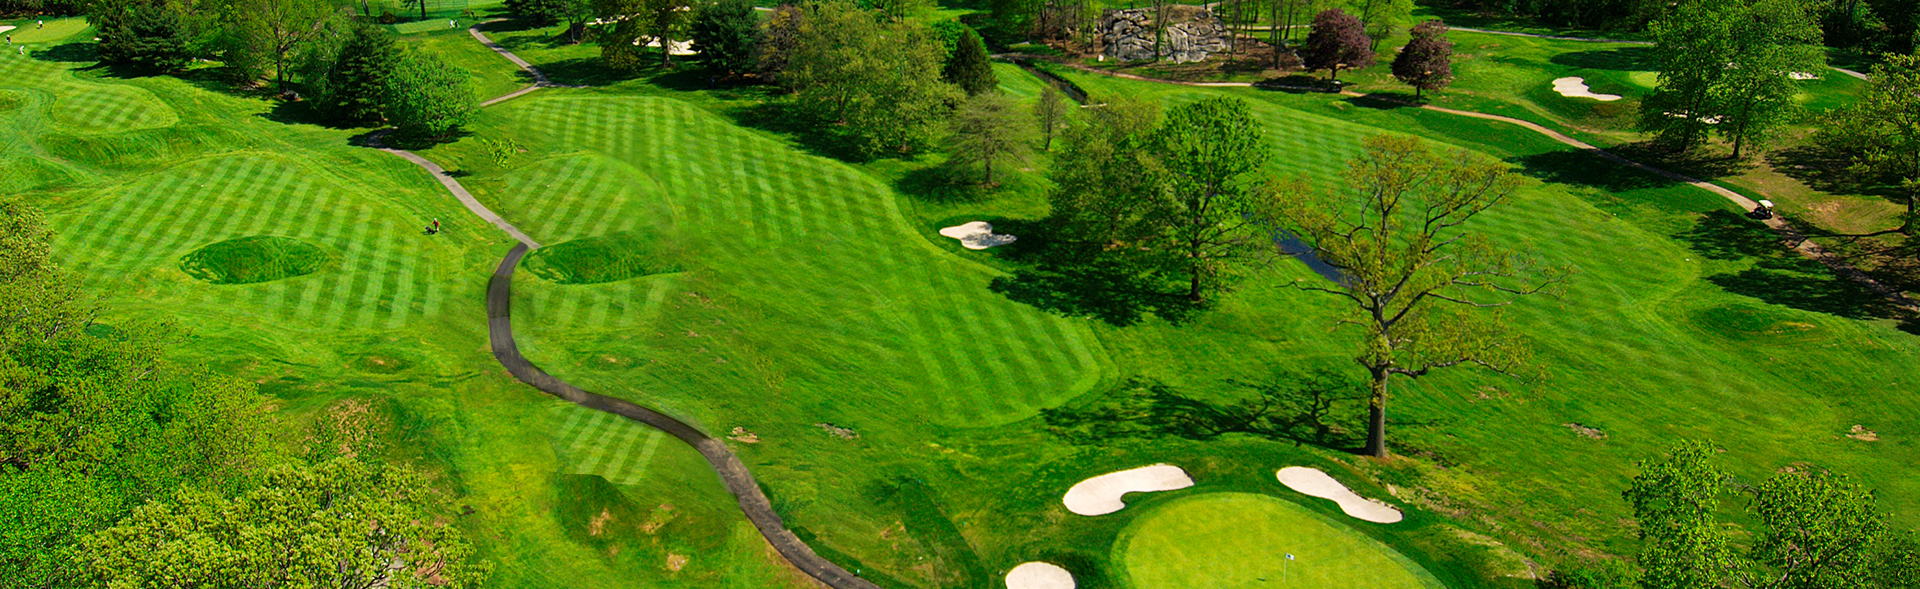
Course Overview
Design, Devereux Emmet / A.W. Tillinghast
Hole 1
Par 4
Yardage 468 blue, 451 white, 435 green
You don't ease into the round of golf at Bonnie Briar-you start with 473 yards of intimidation. From the championship tee your best drive is down the left side, avoiding out-of-bounds and a well-placed bunker there while dealing with a sloping fairway that can direct a less than perfect shot into a deep lie in the right rough. The long second shot must come in high and soft to remain on a firmly contoured green that runs rapidly front to back and slopes away on all four corners, creating a putting and chipping challenge perhaps unrivaled in any opening hole in the region. A par here - 4 for men, 5 for women -- is more than a small victory. Too often, the mission is to avoid starting your round with a big number.
Hole 2
Par 4
Yardage 341 blue, 326 white, 315 green
From this elevated tee, it looks like you can reach out and touch the green. But those with driver in hand risk more than they realize. A 200 yard tee shot is best, keeping you safely short of a penalizing drop-off slope of rough that guards a brief second patch of fairway, only ten paces long, leading up to the Sheldrake River. Drives to the left may catch a gaping bunker or, beyond that, a red-staked bog, while pine trees line the right side of the fairway. But even drives safely in the mowed grass may leave an approach shot that must deal with a towering tree that blocks the right half of the green and swats many a ball into the water. While birdie remains a possibility on this short hole, a more ominous outcome is all too possible due to that barrier and a deceptively swift green that slopes from back to front and has steep sides that-like the tree--can send errant shots bounding toward the drink.
Hole 3
Par 3
Yardage 168 blue, 161 white, 146 green
A classic example of A.W. Tillinghast design, the narrow green is defended on its left by a looming oak, but there's no safety on the right, either, for there waits the steepest of the bunkers that flank the putting surface. While the hole invites a right to left shot, the elevated green makes club selection difficult, especially
in windy conditions. Take care too when putting from past a front pin - the sloping front of this green can easily accelerate such a putt right off the green.
Hole 4
Par 4
Yardage 366 blue, 351 white, 309 green
This narrow hole doglegs right through trees and bedrock, and is at its narrowest in the landing zone for tee shots. The ideal drive will settle on the left side of the fairway 200-to-225 yards from the back tees, though big hitters may gamble with the driver to set up a wedge approach. With exposed rock formations leading up to a green set at the base of a hillside of azaleas, No. 4 provides one of the great vistas on the course. But the two-tiered putting surface is no walk in the park. It is important to keep your approach on the same level as the pin-and good luck to the player who must chip back from the rough behind the green.
Hole 5
Par 3
Yardage 185 blue, 151 white, 120 green
The green here actually is quite large, but it sure doesn't look it from the distant elevated tee. From there, all you may notice are the steep bunkers that protect the target. What's more, club selection can be difficult in swirling winds that are hard to detect from the tee. Once you make the green, you face one of the steepest slopes on the course, pitching from the back left to the front right. Give extra oomph to your putt if you are below the flag and a feathery touch if you make the mistake of being above it.
Hole 6
Par 4
Yardage 403 blue, 388 white, 370 green
You'll hear the croaking of the small creatures that make their home in the lake that hugs the left side of the fairway then turns right across it. The tendency is to drive it right, away from the water, but that only makes the uphill approach longer and could land you in thick rough that can make clearing the hazard an issue. No. 6 features yet another long, narrow green, protected on the left and right by sizable bunkers. There are tricky breaks on even the shortest putts on a hole where handicap strokes often come into play.
Hole 7
Par 4
Yardage 309 blue, 298 white, 286 green
This short hole presents an excellent scoring opportunity if you play it smart. The prudent strategy is to favor the left side of the fairway about 180-200 yards from the back tees. Be careful not to stray too far left, however, as a "hidden" bunker waits just off the fairway there. Drives too far right, meanwhile, will produce a second shot blocked by trees. But this hole produces more birdies than any on the front nine, for a good tee shot leaves an approach that will stick well on the sharply elevated green that slopes back to front. Of course, the perils are obvious too - the deep bunkers and rough that surround the green and, to the left, a hillside of tangled brush. A final note: while long hitters can drive right to the end of the fairway, to the base of the front bunker, this leaves a steep uphill flip to an invisible pin, a golf shot requiring a dexterity possessed by few.
Hole 8
Par 4
Yardage 408 blue, 345 white, 337 green
No. 8 offers a two-tiered fairway with a signature mound sitting in the middle of the lower section. The young and strong may be able to blast their drive to the upper level - everyone else is advised to tee off with a club that will leave them on the lower flats. The second shot to this long narrow green will be blind from there, but you can walk to the top of the hill and pick one of the towering trees behind the green as your target. And while this is another uphill shot, requiring an extra club to reach a back flag, beware of over-clubbing to shorter pin positions - approaches to this green pitch away from you, and left to right. Finally, while the woods and hazard to the left of the fairway may encourage bail-out drives to right, the approach from there brings other barriers into play - a cluster of pines between you and the pin and, beyond them, another mammoth ball-swatting tree. Seeing that trouble on the right, many players miss this green left, thus leaving themselves difficult chips or sand shots onto a putting surface sloping sharply away from that side.
Hole 9
Par 5
Yardage 491 blue, 479 white, 447 green
Uphill at the start and finish, this par five plays far longer than its yardage. Those who hope to reach it in two must clear a large bunker at the corner of a slight dogleg right. Those without the power to clear them must deal with a fairway that pitches sharply left - don't be surprised if a drive that hits dead center winds up in the left rough. But the real challenge here comes up ahead. The final approach of the front nine at Bonnie Briar also is the toughest to gauge. Check out the huge American flag behind the green to see which way the wind is blowing. Unless it's right at your back, you'd better take extra club to deal with the elevation of the hilltop green and a false front that can cause an "almost perfect" approach to trickle agonizingly back at you, right off the green. The catch is, once you are past that false-front, this green bounds away from you, so bold approaches may well wind up over the putting surface. What's more, the quick right-to-left slope of the green makes finishing the nine with a three-putt an all-too-easy.
Hole 10
Par 3
Yardage 202 blue, 188 white, 179 green
Accuracy is needed to start the back nine. Bunkers right and left guard the narrow entrance to this long par three, which requires a long poke - a wood shot for most players - even from the women's tees. The result often is a challenging lie when those tee shots wind up under the trees to the left or in the gully to the right of the green. And while high approaches may hold the green, lower ones will bounce quickly toward the rear. The good news is that this is one of the flattest greens on the course - you should be thinking of draining 20 footers here.
Hole 11
Par 4
Yardage 453 blue, 428 white, 409 green
About the only thing in your favor on this man-sized dogleg right is that it is downhill. From the elevated driving area, you look out on a right-sloping fairway guarded by a single left-side bunker within reach of long hitters. The best line to the green is from that left side, however - drives to the right may wind up in near-impossible rough and require an approach over, or around, a tree perched on the right side of a drop-off 90 yards from the green. In any event, the second shot is blind, over that hill. This is a rare Bonnie Briar green without sand protecting it, but the putting surface breaks sharply left-to-right, making a two-putt - and a par - more than satisfying.
Hole 12
Par 4
Yardage 333 blue, 320 white, 307 green
Squeezed between two monster holes, No. 12 can be seen as a respite. But it's hardly a pushover. Drives yanked left may wind up in a creek not visible from the tee, while those hit too far right will leave a blocked second shot to the green.
The pinched landing area makes it wise to keep the driver in the bag - a 190-yard tee shot to the left side of the fairway will take the driving-area bunker out of play and provide a clear approach to the sharply elevated green. Don't be shy about using an extra club, either. What appears to be the hilltop start of this green actually is about 20 yards more of unseen fairway -- the pin is further away than it appears. Second shots should favor the right side too, for the green pitches to the left.
Hole 13
Par 4
Yardage 458 blue, 426 white, 396 green
From the 12th green you head downhill and to the left, over the creek, to a whole new geography -- the scenic closing portion of Bonnie Briar, featuring the winding Sheldrake River and some good birdie opportunities. But before those come, you must confront the toughest hole on the course. Both captivating and intimidating, No. 13 features an elevated tee complex that provides a better view of the horizon and distant green than of the onset of a narrow fairway. Your drive must be long and accurate, through a shoot, to avoid the thick woods to the left and the wall of exposed rock to your right. Tee shots into the rocks may miraculously ricochet back into the fairway, but don't count on it. Average hitters, and even many long ones, when they drive into the rough, will find it wise to lay up their second shots short of the river, which crosses the fairway 60 yards short of the green. And as if the long-game challenges were not enough here, the green has bunkers on both side and slopes slickly from back to front - it's another one on which it's possible to putt off the short grass if the pin is placed in the front. As on holes 1 and 11, par here is an accomplishment.
Hole 14
Par 4
Yardage 320 blue, 298 white, 281 green
This is another short par four that requires a choice off the tee. A driver should take the lake on the left out of play, but puts the right-side fairway bunker into range, and could well leave you with one of those delicate less-than-full wedge shots. Whatever choice you make off the tee, the second shot requires calculation too. You'll want extra club to account for the elevation of the green, and to keep from getting stuck in a steep front embankment of rough. But you do NOT want to leave yourself past the pin here. With a slick back-to-front slope, this green presents among the most difficult approach putting on the course.
Hole 15
Par 3
Yardage 133 blue, 125 white, 114 green
After you climb up the hill from the 14th green and step up to a large tee box, this par three may look like a piece of cake. But it isn't. The green is bunkered on three sides, and its sloping banks can kick errant shots into unpleasant places. It's also another slick front-to-back putting surface with countless small breaks. That said, this is a scoring opportunity--take advantage of it.
Hole 16
Par 5
Yardage 525 blue, 508 white, 445 green
The blind downhill tee shot here can mean the difference between par and an X. Local wisdom has it that your target should be the chimney of the house barely visible, dead-center, among the woods in the distance. But it's hard to forget the OB left, or how the hazard on that side comes closer in toward the fairway than it appears. Meanwhile, the looming tree on the right, amid the rocks at the top of the drop-off, will deflect all but a booming drive in that direction. The result can be a poor lie on the downhill slope, or in the right rough, that makes clearing the Sheldrake no sure thing on the second shot. An accurate drive, however, sets up a straightforward shot over the river that you can lay up to your favorite approach distance. Then the hard work is over, for this stretch of fairway is perhaps the flattest on the course. And the green too is relatively flat - a friendly surface, as on hole 10, where you can roll putts with confidence.
Hole 17
Par 5
Yardage 518 blue, 442 white, 288 green
For higher handicapper, or older player, simply driving over the Sheldrake may be a challenge. To the college player or pro, on the other hand, it should be a drive-and-iron. Women meanwhile will appreciate how this is one of the few times at Bonnie Briar where the Green tee really does carve off substantial yardage, making the hole a Par 4 rather. But No. 17 is a pleasing experience for any player, going dead-straight through natural rock formations and trees, with a steadily narrowing fairway that offers a tense, pinched opening to those going for the green in two. Though there's potential for disaster on either side, a low score is within reach for those who correctly judge the approach - to a substantially elevated green featuring an unforgiving false front. The challenge does not end once reaching the well contoured, right to left sloping green where a two putt is not a "given".
Hole 18
Par 4
Yardage 304 blue, 294 white, 235 green
The round at Bonnie Briar ends in another short par four that forces you to make a decision on the tee and on which you are advised to avoid winding up behind the hole on a perilous green. The high-percentage drive is a 200-yard tee shot that leaves you short of a variety of fairway bunkers waiting to capture an errant shot. Once in the fairway your work is not over as players must make their way over or around one the most severe bunkers on the course. Players will do well to calculate the correct distance to the flag on their approach to green that looks relatively flat from the fairway but, features some hidden pockets and undulations on the right side. Still, if you forget what's on the line on any final hole - and how the lunch crowd may be watching from the clubhouse terrace -- you can take the memory of a birdie to the all-too-welcome 19th hole.
Hole 19
Cheers!